The DHT is the sensor almost every weather-station and greenhouse project starts with. It is cheap, it needs one pin, and it gives you temperature and humidity from a single part — which is why it turns up in more student projects than any other sensor.
It is also slow, low-precision and easy to wire in a way that almost works. All three of those are worth knowing before you build around it.
Which one to buy
| DHT11 (blue) | DHT22 / AM2302 (white) | |
|---|---|---|
| Temperature range | 0 to 50 °C | -40 to 80 °C |
| Temperature accuracy | +/- 2 °C | +/- 0.5 °C |
| Humidity range | 20 to 80 % RH | 0 to 100 % RH |
| Humidity accuracy | +/- 5 % | +/- 2 % |
| Readings per second | 1 | 0.5 — one every two seconds |
| Price | The cheaper one | Roughly twice as much |
Same wiring, same library, one line of code different. The DHT11 cannot read below 0 °C at all, so anything involving a fridge, a cold store or a hill station needs the DHT22.
What you need
- An Arduino Uno, Nano or Mega — any of them
- A DHT11 or DHT22 sensor
- A 10 kΩ resistor, unless your sensor is on a small breakout board that already has one
- Three jumper wires
Wiring
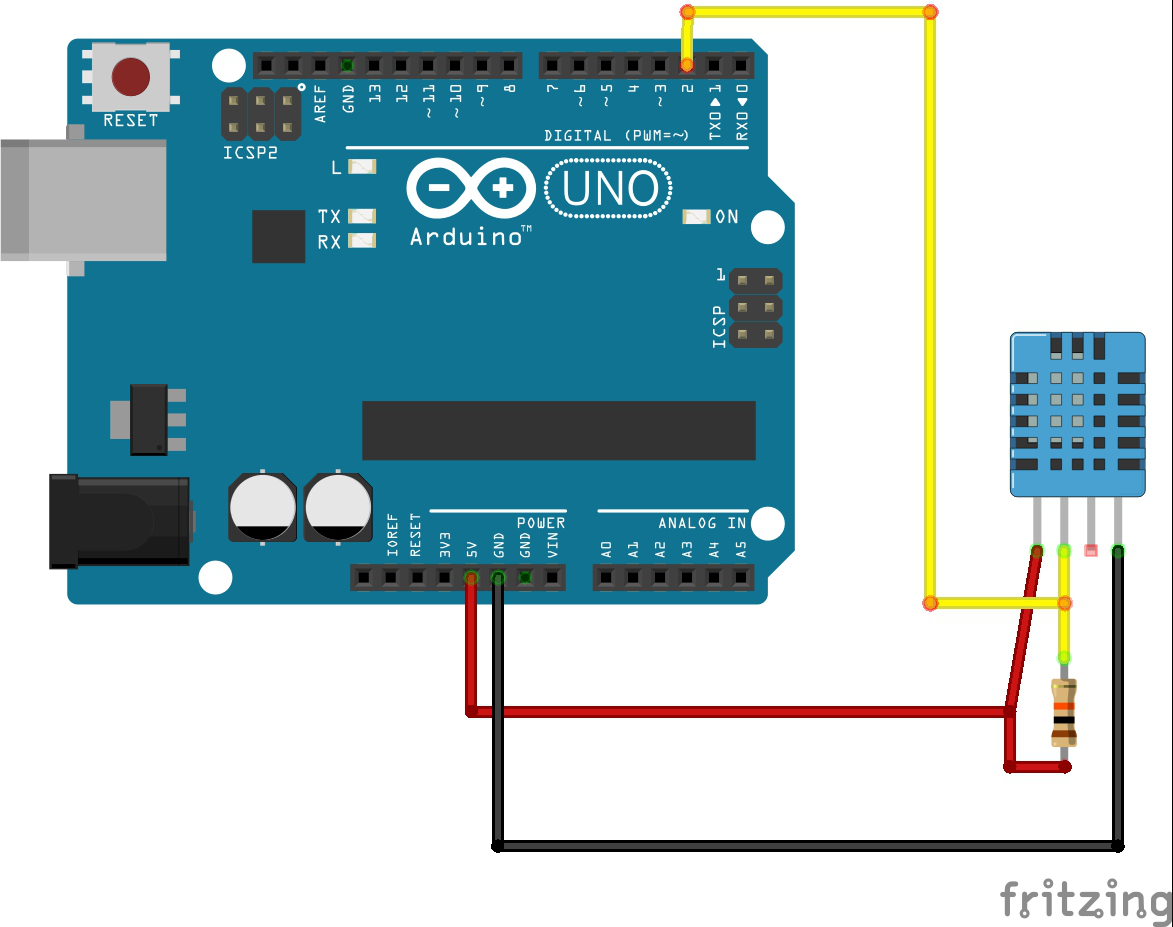
| DHT pin | Goes to | Note |
|---|---|---|
| 1 — VCC | 5V | 3.3 V also works, but readings drift a little |
| 2 — DATA | Pin 2 | And through 10 kΩ up to 5V |
| 3 | nothing | Genuinely unused on the four-pin part |
| 4 — GND | GND |
Pin 1 is the one nearest the corner of the grille when the grille faces you. A three-pin module is usually marked + / OUT / - and needs no resistor.
The library
The sensor speaks a timing-critical one-wire protocol of its own, and reading it by hand is not a useful exercise. Use Adafruit's library — in the Arduino IDE, Sketch → Include Library → Manage Libraries, search for DHT sensor library, and install it. It will offer to pull in Adafruit Unified Sensor as well; say yes, or the examples will not compile.
The sketch
#include "DHT.h"

#define DHTPIN  2       // the sensor's data pin
#define DHTTYPE DHT11   // change to DHT22 for the white one

DHT dht(DHTPIN, DHTTYPE);

void setup() {
  Serial.begin(9600);
  dht.begin();
}

void loop() {
  // The DHT is slow. Ask it faster than once every two seconds and it hands
  // back the previous reading again rather than a fresh one.
  delay(2000);

  float humidity = dht.readHumidity();
  float celsius  = dht.readTemperature();

  // A failed read returns NaN, not zero. Checking for it is what stops the
  // serial monitor filling with 0.00 while you believe the sensor works.
  if (isnan(humidity) || isnan(celsius)) {
    Serial.println("No reading - check the data pin and the pull-up resistor");
    return;
  }

  Serial.print("Humidity ");
  Serial.print(humidity);
  Serial.print(" %   Temperature ");
  Serial.print(celsius);
  Serial.println(" C");
}How the code works
- 1
DHTTYPE picks the sensor
One line is the entire difference between the two parts. Set it wrong and you get readings that are plausible but incorrect, which is worse than getting none.
- 2
delay(2000) is a requirement, not politeness
The sensor takes about two seconds to make a measurement. Poll it faster and the library returns its cached value, so your graph looks smooth and is lying to you.
- 3
isnan() catches the failure
A failed read is Not a Number, and NaN printed with Serial.print appears as
nan— but NaN used in arithmetic silently poisons everything downstream. Test for it before you use the value, every time.
When it does not work
| What you see | Cause | Fix |
|---|---|---|
No reading every time | No pull-up, or DATA on the wrong pin | Fit the 10 kΩ resistor. Check DHTPIN matches the wire. |
| Readings for a while, then nothing | Polled too fast, or a long unshielded data wire | Keep to two seconds. Keep the wire under about 20 cm. |
| Humidity always 0 or always 100 | DHT11 asked for a value outside 20–80 % RH | It cannot read there. Use a DHT22. |
| Temperature 2–3 °C too high | The sensor is sitting on the board, warmed by the regulator | Move it away on wires. This is real and it is the commonest complaint. |
| Nothing at all in the serial monitor | Baud rate mismatch | The monitor must be set to 9600 too. |
Where to take it
- Add an LCD or OLED and it is a room monitor with no computer attached.
- Add an ESP32 or ESP8266 and it logs to a phone — the same sensor, the same library.
- Add a relay and a threshold and it is a greenhouse or an incubator controller, which is a full final-year project.
- Log to an SD card with a timestamp and you have data for the results chapter of a report, which is the part most projects are thin on.